PicoTrak version
2.0d
(formerly known as
ProjecTrak)
© 2004 James
Preston
January, 2004
Brought to you by Inertron Software
Email: support@inertron.com
This product is
shareware, US$25.
You can register
and pay for it at this website:
PicoTrak now has
a desktop companion program. Try it at www.inertron.com/palm/ptdesk.
Shareware Notice
This product is
NOT free. If you continue to use it, you are obligated to pay for it.
PicoTrak is
distributed fully functional; it is not crippled in any way. There is, however,
a 30-day evaluation period. After 30 days, if you have not registered, the application
will cease to function. All your data will remain intact, as long as you don't
delete the application. When you register (and enter your valid registration
code) the application will again work and all your data will be there.
You can, of course,
register at any time. Doing so will permanently remove the reminder screen that
shows every time you start PicoTrak.
Registering entitles
you to unlimited upgrades; all future versions will recognize and accept your
registration code.
Important note
to those upgrading from a version of TimeTracker:
Follow these steps
EXACTLY to avoid losing your data:
- Leave TimeTracker in place on your Palm device. Do NOT delete it until instructed
to below.
- On your PC/Mac, use the Palm install tool and HotSync to install the PicoTrak.prc
file onto your Palm device.
- On your Palm device, launch the PicoTrak application.
- You should see the main display, looking very familiar, with all your TimeTracker
projects just as you left them. If you do not see your projects, stop here
and contact support@inertron.com for assistance.
- Exit PicoTrak by tapping the "Home" button to return to the Palm Launcher.
- Use the Palm Launcher's "Delete" menu command to delete the TimeTracker
application (if you are not familiar with using the "Delete" command, please
refer to the documentation that came with your Palm device).
- You're done. Use PicoTrak just as you used TimeTracker, and enjoy the
new hourly rate feature.
Introduction
PicoTrak is a
time-keeping tool for contract workers, lawyers, or anyone else who works on
multiple projects on an hourly basis. You enter the project names and optionally
assign each to a client. Select a project and tap to start a timer for that
project. Tap again to stop the timer. You can start and stop projects as often
as needed throughout the day and the times are accumulated. A detail view shows
the daily totals for each project. You can also get a summary over all projects
for a specified time period. The data can be exported to a memo for transfer
to your PC during the next HotSync operation. Times can be displayed in any
of five different formats.
PicoTrak is compatible
with all Palm devices from the Palm Pro on up, including the Palm III,
Palm V, Palm m100 series, Palm m500 series, Palm i700 series, Palm Zire, Sony
Clie series, Palm Tungsten series, etc. It has been tested under and is complaint
with Palm OS 5.
The Main Display
|
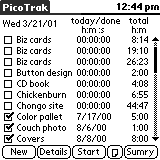
The main display consists of four columns:
- A checkbox used to indicate that a project has been completed.
- The project name.
- Today's daily time (or the date on which a project was completed).
- The overall total time for the project, or the total of the unbilled
time for the project. You can toggle between the two by tapping on the
column header (i.e. the word "total" or "unbilled").
The list is sorted alphabetically by project name.
|
 |
|
The buttons across the bottom:
| New |
Create a new project. |
| Details |
Detailed view of a project. |
| Start |
Start (or stop) the timer for the selected project. |
| Note |
Add a note to the current date of the selected
project. This will work even if the selected project is the project
being timed. It's important to remember that this does not add an
overall note for the project, it's just a shortcut for adding a note
to today's date. |
| Sumry |
Open the Summary screen. |
|
The
Options Menu
|
Some PicoTrak
functions are accessed via the Options menu. You access the menu by tapping
the menu button, which is the button in the lower left of the silk-screen
area. Tap the menu name (if needed) to show the menu, then tap the desired
menu item.
|
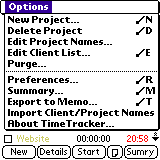 |
| New
Project |
Same
as the New project button. |
| Delete
Project |
To
delete an entire project, first tap to select it and then select this
menu item. You will be asked to confirm the delete. |
| Edit
Client List |
Brings
up a dialog for editing the available client
names. |
| Edit
Project Names |
Brings
up a dialg for editing the list of project
names. |
| Purge |
Allows
you to delete completed projects and/or billed
dates. |
| Preferences |
Brings
up the Preferences dialog. |
| Summary |
Same
as the Sumry button: open the Summary screen. |
| Export
to Memo |
Brings
up a dialog for exporting your data to a memo
in the MemoPad. |
| Import
Client/Project Names |
Allows
you to import a list of client and project names
from a memo. |
| About
PicoTrak |
Information
about PicoTrak (version and contact information), or registration
information if you have not yet registered. |
|
Auto
Scroll
|
Eventually,
you will probably have a lot of projects entered into PicoTrak. To
help you quickly locate a desired project, there is a navigational shortcut.
Write a lowercase letter or digit in the Graffiti area and the display
will automatically scroll to the first project that starts with that letter
or digit (or the first project that starts with a higher letter or digit
if none exist that start with the one you wrote).
This also
works in the client list view, automatically
scrolling to the first client name that starts with the letter or digit
entered.
|
Color
Support
|
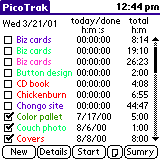
Starting with
version 1.7, PicoTrak is in color (on color devices, such as a Palm
IIIc, Palm m505, Sony Clie, or Visor Prism). You can assign a color to
a client, and project names are displayed in their client's color. See
Editing Client Names below for more details.
|
 |
International Time,
Date and Number Formats
|
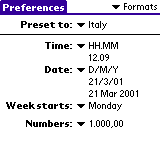
PicoTrak honors the time, date and number formats that you select
from the Palm's Prefs application. All dates, all time values,
and all numeric values will be displayed in the selected Prefs
formats.
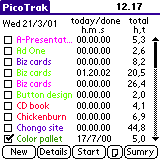
The example to the right shows the Prefs application setting the
formats to the presets for Italy. This setting uses a '.' as the separator
between hours and minutes, a ',' as the radix character in numbers, and
specifies that dates be displayed in a "date/month/year" format.
The PicoTrak screen on the right shows the middle column (which always
displays hours, minutes, and seconds) using the '.' separator. The total
column is displaying hours and tenths of an hour (PicoTrak lets you
choose among a number of different formats)
using the ',' radix character. And the date in the upper left is in "M/D/Y"
format.
|
|
Creating a New
Project
|
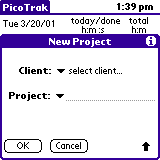
Tap the New
button (or select New Project from the Options menu) and
enter the name of a project. The popup menu on the field contains a list
of all unique project names entered so far. Selecting a name from this
list will automatically enter it in the Project name field; this
is a convenience if you have multiple projects of the same name.
If desired,
use the Client popup to select the client that the project belongs
to (the popup also leads to a dialog
for entering and editing client names).
If you have
assigned an hourly rate to the selected client, that rate will automatically
be assigned to the new project.
|
 |
Importing a list
of client and project names
|
If you have
a pre-existing list of client names or clients and projects, you can save
time by importing them into PicoTrak.
Using your Palm
Desktop software, create a memo in the MemoPad with the title "ttimport"
(without the quotes); the title must be exact.
Each subsequent
line of the memo may contain either a single client name, or a client
name followed by a comma and a project name.
Please note
that the rules for parsing the memo are very simple: If there is no comma
on a line, the entire line is considered a client name; if there is a
comma, then everything before the comma is considered the client name
and everything after the comma is considered the project name. This means
that if you put a blank space after the comma, you will get a project
name that starts with a blank (which is probably not what you wanted).
Now perform
a HotSync function to get the memo onto your Palm device. Run PicoTrak
and tap on the "Import Client/Project Names" menu item. Tap
"OK" in the warning dialog, and you're done; the clients and
projects from your memo will now be in the PicoTrak client and project
lists.
Here is an example
memo:
ttimport
Argo City,Biz cards
Concat,Biz cards
Concat,green project
Flowpond
Faraday Melos
After this has
been imported, there will be four new clients in the client list: "Argo
City", "Concat", "Flowpond", and "Faraday
Melos". In addition, there will be three new projects: a "Biz
cards" with "Argo City" as the client, another "Biz
cards" with "Concat" as the client, and a "green project"
with "Concat" as the client.
It is not possible
to import a project name without a client name. If you want to import
a list of projects and you don't care about the client name, you can just
use a dummy client name on each line (such as "c").
|
Using the Timer
| When
you want to start timing your work, select a project name and tap the Start
button. The timer will start for that project and the running daily time
will be underlined. When you stop working on that project, tap the St
op button to stop the timer. If you are switching to a different project,
select it and tap the Start button to start the timer for that project.
If you go back
to timing the first project, the timer will pick up from where it left
off (currently there is not an automatic way to keep track of individual
work "segments" in a day but you can manually itemize your time
using the note feature on the Details
View or by setting up your projects as daily tasks).
|
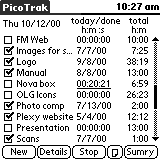 |
Optionally,
if the Tap in 'today' col controls timer preference
is turned on, you can start the timer for a project by simply tapping on
that project's today column. Tap again to stop the timer. If one
project is being timed and you tap on the today column of another
project, the first project's timer is automatically stopped and the second
project's timer is started. This allows you to quickly switch from one project
to another with a single tap.
If you have
a lot of projects, you can enter a "." character (tap-tap)
on the main display to automatically scroll to the project being timed.
Note that the
running time is not added to the total column until you stop the timer.
|
The Project Details
View
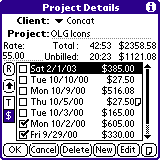
| Select
a project and tap the Details button to bring up the Details View
dialog. At the top are the project name and client. You can change and/or
edit those from here.
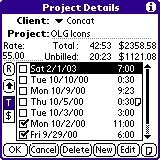
The list in the middle of the screen shows every date on which any time
was accumulated for the project, and the time for that date.
The small button on the left with the arrow on it toggles the order of
the list between ascending and descending by date.
The checkboxes to the left of each date can be used to check off dates
as they are billed. The billed status of dates can be used to control
which dates are exported, and you can easily delete
all billed dates with the purge command.
Above the list is the total time for the project (the sum of all the
times in the list), and the total unbilled time (the sum of just the unchecked
dates).
Hourly Rate:
To the left of the totals is the hourly rate for this project. To the
right of the total and unbilled times are the corresponding monetary totals
(time multiplied by the hourly rate). The rate is in an editable field
so you can change it. However, if you do change it, you need to tap the
small "R" button underneath the field to have the monetary totals
recalculated with the new rate.
On the lefthand
side, below the arrow button is a pair of toggle buttons. One has a "T"
for "Time", the other has the currency character (which is settable
on the Preferences screen). As seen in the
screenshots to the right, these buttons control whether the right column
of the table shows the times or the money values (time multiplied by hourly
rate) for each date.
|
 |
The buttons across the bottom:
| OK |
Returns
to the main display and saves all changes made in the Details dialog. |
| Cancel |
This
button will undo all changes made in the Details dialog, with two
exceptions: Changes made to an existing note will remain, and notes
that were deleted will not come back. |
| Delete |
Deletes
the selected date. |
| New |
Adds
a new date to the project. Tapping this button will bring up the standard
Palm date selector. Tap the desired date and it will be added chronologically
to the list of dates. You can then use the Edit
button to enter the desired time for that date. You are not allowed
to add a date in the future. |
| Edit |
Allows
you to edit the time on the selected date. See below
for details. |
| Note |
Allows
you to add a note to the selected date (or edit an existing note).
A note icon is shown to the right of any date that has an attached
note. |
The scroll
buttons of your Palm device (the physical buttons below the screen) can
be used to cycle through the projects without the need to go back and
forth to the main view. Any changes made are automatically saved when
you use these scroll buttons.
|
|
Editing
Time
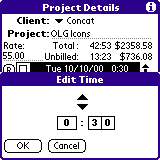
You can manually
change the time on an existing date. This might be needed if you stop
working on a project but forget to stop the timer, or if you forget to
start the timer when you start working. To change the time, select the
date and tap the Edit button. In the small window, select one of
the digits and use the arrow buttons to change it appropriately.
|
|
|
Both of the
minutes digits behave additively. As you increase (or decrease) a value,
it affects the entire time as if you were adding (or subtracting). For
example, if the time is "2:39" and you select the ones digit
and click the up arrow, the time will become "2:40" (you added
one minute). If the time is "3:04" and you select the tens digit
and click the down arrow, the time will become "2:54" (you subtracted
ten minutes). This should make it easier to add in an amount of time;
no manual addition is necessary, as it was previously. For example, if
the current time value is "2:47" and you need to add an additional
35 minutes, you do it by tapping to select the ones digit, then tap the
up arrow five times, then tap the tens digit and tap the up arrow three
times. This has the effect of adding the 35 minutes to get the new value
"3:22".
If you manually edit today's time and increase it, and then start the
timer for that project, it's possible that the timer will reach 24 hours.
Since it's not possible to have more than 24 hours in a day, if this happens
the timer will automatically stop and a warning will appear.
|
Editing Project
Names
|
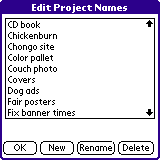
The Edit
Project Names menu item brings up a dialog that shows a list of project
names. Initially, this list is automatically generated and contains every
unique project name that has ever been created. This list is used in
the New Project dialog, and the Summary
screen.
Note that changes
made here affect only the popup list in the New Project dialog;
changing a project name here does not change existing project names in
the main list; adding a project name here does not add a new project to
the main display.
|
 |
Editing Client
Names
|
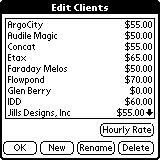
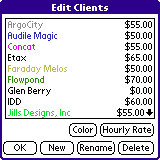
The Edit
Client List menu item brings up a dialog that shows all the client
names currently in use.
This dialog
works differently than the Edit
Project Names dialog in that changes made here do indeed affect the
client names used elsewhere in the application. For example, if you have
five projects with a client of "ArgoCity" and you use this dialog
to change that client name to "Argile City", all five projects
will then show "Argile City" as the client in the details view.
Hourly Rate:
Tap on a client name then tap the Hourly Rate button to assign
a rate to that client. From then on, when you create a new
project under that client, the project will automatically be assigned
the client's hourly rate. You can, of course, change a project's hourly
rate on the Project Details view.
|
|
| If
you have a color Palm device, you can assign a different color to each client
name. On the main display (and on the Summary screen), project names are
displayed in their client's color. This should make it easier if you have
multiple projects with the same name for different clients. |

|
Completing
Projects
When you complete a project, check it off using the checkbox at the left of
the main display. The middle column will now show the date that it was completed
(the date on which you checked the checkbox). You can set a preference
to have completed projects sorted to the end of the list to get them out of
your way. When you do an export, you can choose to have
completed projects included in the export, or not. You can easily delete all
completed projects with the purge command.
Preferences
|
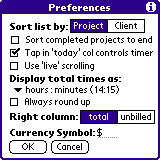
You can choose
to have the main list sorted alphabetically by project name, or by client
name. In the latter view, each client name is listed, followed by the
projects belonging to that client. Tapping on a client name brings up
the New Project window with that client
selected.
You can choose
to have completed projects sorted to the end of the main display, useful
to get them out of the way of projects you're still working on.
The "Tap
in 'today' col controls timer" option determines whether or not you
can start and stop the timer by tapping in the "today" column
of the main display.
The "Use
'live' scrolling" option determines whether the display will scroll
while the scrollbar controls are being activated, or if the display will
only scroll once a scrollbar control is released. Live scrolling is generally
nicer, however there is a bug in the OS that sometimes causes the display
to jump back to a previous position when live scrolling is used. If you
experience such jumping, you should turn off this option.
The "Right
Column" option controls what is displayed in the righthand column
of the main display. You can choose to see either the overall total time
for the project, or the total of just the unbilled dates. If you choose
the former, and you have a color Palm device, the total will be displayed
in red if there is any unbilled time for that project.
You can also
toggle this option directly from the main display by tapping on the column
header. For example, if it is set to display total time, a tap on the
word "total" will change it to display the unbilled time.
The "Currency
Symbol" is used on the lefthand side of monetary values, shown in
various places such as the Project Details screen and the Summary screen.
|
|
|
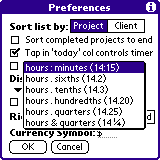
You can choose to have times displayed in any of six different formats:
- hours and
minutes ("14:15")
- hours and
sixths of an hour ("14.2")
- hours and
tenths of an hour ("14.3")
- hours and
hundredths of an hour ("14.20")
- hours and
quarters of an hour in decimal format ("14.25")
- hours and
quarters of an hour in fractional format ("14 1/4")
The header above the total column on the main display changes
to reflect which format is currently selected, to serve as a reminder.
This option affects all displayed and exported times except the "today"
column of the main display, which always displayes hours, minutes and
seconds.
Also, if the "quarters of an hour in fractional format" option
is selected, the Export function (described below)
will output totals using decimal format since PC programs would not understand
the Palm's font.
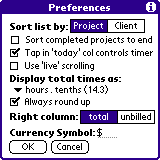
"Always round up" - If this checkbox is checked, time values will
be rounded up to the next highest value of the selected time format. If
it is not checked, times will be rounded up or down to the nearest value.
For example, if the time format is hours.tenths, the values in that format
are multiples of six minutes. The following table shows the affect of
the two rounding options:
|
actual
time
|
rounded
|
rounded
up
|
|
1:01
|
1.0
|
1.1
|
|
1:02
|
1.0
|
1.1
|
|
1:03
|
1.1
|
1.1
|
|
1:04
|
1.1
|
1.1
|
|
1:05
|
1.1
|
1.1
|
|
1:06
|
1.1
|
1.1
|
|
1:07
|
1.1
|
1.2
|
|
1:08
|
1.1
|
1.2
|
|
1:09
|
1.2
|
1.2
|
|
|
|
The "Sort completed projects to end" option also applies if the
Sort list by Clients option is selected; i.e. completed projects
are sorted to the end of the entire display (prior to version 1.7, completed
projects were sorted to the end of their respective client sections). This
means that the main list will actually consist of two lists: first, a list
of clients with the uncompleted projects, and then a list of clients with
the completed projects.
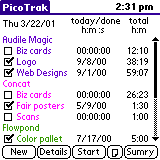
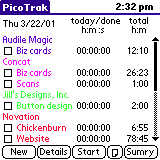
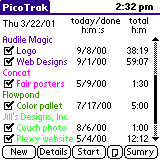
The examples to the right should make this clear:
- The top screenshot
is sorted by client with the "Sort completed projects to end"
option turned off.
- The second
and third screenshots are with the option turned on.
- In the
second screenshot, the view is scrolled to the top of the list,
showing uncompleted projects.
- In the
third screenshot, the view is scrolled near the bottom of the list,
showing completed projects.
|
|
The
Summary Screen
|
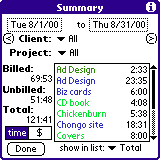
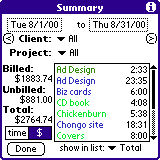
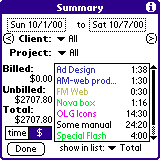
This screen allows you to see the total times -- billed, unbilled, and
overall total -- between two specified dates. There are popup menus for
specifying a client and/or a project.
The table in the middle displays the totals for individual projects
for the specified period. The popup at the bottom right allows you to
see either the overall total, just the billed total, or just the unbilled
total.
To get a summary
across all projects, set the Client and Project popups
to "All".
The summary
information is automatically recalculated when either of the date selectors
or either of the popups are changed.
|
 |
|
The toggle buttons in the lower left allow you to switch the totals between
time and money. The symbol on the righthand button (a "$" here)
will be the currency symbol as set on the Preferences
dialog. |
 |
|
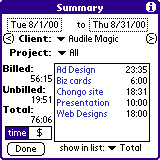
To get a summary of all projects for a particular client, select that
client name and set the Project popup to "All"
|
 |
|
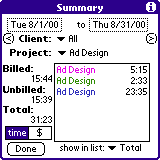
If you have more than one project of the same name but with different
clients, you can get a summary of all projects with that name by selecting
the name from the Project popup and leaving the Client popup
set to "All". |
 |
|
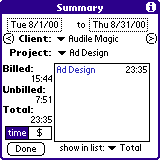
If, on the other hand, you want to see one specific project (from among
several with the same name but different clients), you will need to
select both the project name and the desired client name.
|
 |
|
Once you
have used the two date selectors to set a time interval, you can "scroll"
ahead or backwards by the interval amount using the two little arrow buttons.
The left
arrow moves the dates into the past, and the right arrow moves the dates
into the future. Both dates are moved by the difference between the
two.
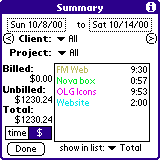
For example,
the top screen on the right shows the interval set to one week, from
Sunday the first through Saturday the seventh.
Tapping
the right arrow button will move both dates seven days ahead, as shown
on the next screen, so that the summary is now for Sunday the eighth
through Saturday the fourteenth.
|
|
Export to Memo
|
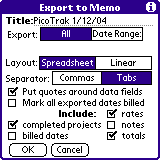
To get your
PicoTrak data into an application on your PC/Mac such as Excel, use
the following steps:
- Bring up the Export to Memo dialog (tap the Export to Memo
menu item.
- Select the desired options (see below).
- Tap the OK button. This will create a memo in the Palm MemoPad
application.
- Perform a HotSync.
- Run the Palm Desktop application on your PC or Mac.
- Open the memo(s) containing the PicoTrak data.
- If the destination program supports a direct paste operation
(such as Excel), you can select the entire memo and copy it,
then paste it into the destination program.
- Otherwise, you can save the memo(s) into a text file and then import
that file into the destination program.
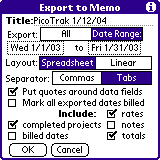
Options
If you select All, the exported data will include all dates (subject
to the options explained below). If you select Date Range, two
date selector boxes will appear. You can then select a starting and ending
date. Only project dates between those (inclusive) will be exported.
In the Export dialog, you have two layout options, Spreadsheet
or Linear.
Select Spreadsheet
layout if you will be importing the data into a spreadsheet program. The
output will be in a column-oriented format -- each date on a separate
line such that all clients, projects, dates, times, etc. are in the same
columns -- and will include a header line identifying the columns. For
example:
      Client  Project  Date  Hours Rate  Total  Billed? Notes
      client1 project1 1/1/03 2:10 50.00 108.33 yes
      client1 project1 1/2/03 3:30 50.00 175.00 no
      client1 project1 1/3/03 3:00 50.00 150.00 no
      client1 project1 Total: 8:40 433.33
      client1 project1 Billed: 2:10 108.33
      client1 project1 Unbilled: 6:30 325.00
      client2 project2 1/1/03 1:20 55.00 73.33 no
      client2 project2 1/2/03 2:50 55.00 155.83 no
      client2 project2 Total: 4:10 229.16
      client2 project2 Billed: 0:00 0.00
      client2 project2 Unbilled: 4:10 229.16
|
|
If you do not have the Include billed dates option selected, the Billed?
column will not be included, nor will the Billed: and Unbilled:
total rows.
Select Linear layout if you will be importing the data into a program
that expects a more compact format. The output will have each project on a single
line, and will not include a header line. The order of the fields is:
client,project,[hourly rate],date,hours,[$total],[billed?], . . . total_hours,[$total],billed_hours,[$billed],
unbilled_hours,[$unbilled]
Where fields enclosed in square brackets will only appear if the appropriate
option is selected.
For example:
client1,project1,50.00,1/1/03,2:10,108.33,yes,1/2/03,3:30,175.00,no,1/3/03,3:00,150.00,no,
8:40,433.33,2:10,108.33,6:30,325.00
client2,project2,55.00,1/1/03,1:20,73.33,no,1/2/03,2:50,155.83,no,4:10,229.16,0:00,0.00,4:10,229.16
The Separator option allows you to select what character is used between
data fields, either a comma or a tab. If you are not sure which to use, try
making two memos the first time, one with commas and one with tabs, and then
see which is accepted by the program you are importing into.
You also have the option to put quotes (") around each data field or
not. Most programs that can import data are smart enough to understand quoted
fields, and it is recommended that you use quotes if you will be including
your daily notes (without quotes, any comma, tab, or newline that appears
in a note will be interpreted by the importing program as a field separator).
The Mark all exported dates billed option will automatically check
the billed checkbox for all dates that are exported. This can be useful
if the way you use the export feature is to bill all of the projects and dates
that are exported; this option saves you from having to manually go through
and check all the billed checkboxes. Since currently your only choice
is to export all the data, this means that if you turn on this option, all
dates on all projects will be marked as billed.
The other options allow you to select whether to include projects that are
marked completed, dates that are marked as billed, and/or the daily notes.
A Note About Memo Size
The PalmOS limits a single memo to 4,000 characters. When the exported data
exceeds that size, PicoTrak automatically creates a second memo (and a
third, fourth, etc. if necessary). The new memos have the same title as the
first plus sequential numbering. Thus, if you use the default title of "PicoTrak
Data", the first memo will have that title, the second memo will have
the title "PicoTrak Data1", the third memo will be "PicoTrak
Data2", etc.
After you perform a HotSync function, you will need to either manually combine
the multiple memos into one text file, or do multiple copy-paste operations,
to get the data into your spreadsheet application (or whatever application you
desire). The data is always split between memos at a line boundary to make this
task easier.
Purge
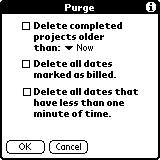
This command has three options; you can select any of them in any combination.
- You can delete
all completed projects that are older than a specified time. Only completed
projects are candidates for being deleted; all projects with an unchecked
checkbox are unaffected. You can choose a time of now, one month, three
months, six months, or nine months. All projects whose completed dates
are older than the selected time will be deleted. The Now choice
will delete all completed projects.
- You can choose
to delete all dates that are marked as billed. The billed
checkbox is on the left of each date in the Details
view.
- You can choose
to delete all dates that have less than one minute of time on them.
This is useful if you accidentally started the timer and then stopped
it a few seconds later.
This command
cannot be undone!
Please be certain that you have billed for, or at least recorded the
times for, all completed projects and/or all billed dates that might be
deleted.
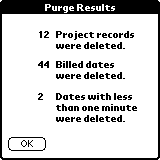
When the purge is finished, a screen is displayed showing the various
results.
|
|
Crossing Midnight
If you work late into the night and have a timer running over midnight, PicoTrak
will automatically change to the next day and continue the timer.
If you accidentally leave a timer running and don't return to PicoTrak
for several days (you forget to turn the timer off on Friday and leave it
running over the weekend, for example), all intervening days will have accumulated
24 hours of time. You can use the Details View to delete those dates.
New Features
in Version 2.0
Name changed from
TimeTracker to PicoTrak.
You can assign an
hourly rate to any project, and that rate will be used to show a monetary total
(the time multiplied by the rate) in various places. You can assign a "default"
rate to each client, and that rate will be used on all new projects created
under that client. The rate for each project can also be set individuallly.
A new option to specify
that times should always be rounded up, rather than being rounded up or down
to the nearest even multiple of the selected time format.
In the Summary view,
the up and down buttons on your Palm device will function like the right and
left arrow buttons, respectively.
New Features
in Version 1.8
You can now choose
to have the righthand column of the main list show either the overall total
time (as before) or show the total of just the unbilled dates for that project.
This option can be set on the Preferences dialog,
or by simply tapping on the column header.
You can now import
a client/project list from a memo in the MemoPad.
The Summary
screen now includes buttons for "scrolling" backward or forward
by the selected interval.
You have the option
to use live scrolling or not.
PicoTrak version
1.8 is PalmOS 5.0 compliant.
New Features
in Version 1.7
Color
support. You can assign a color to each client, and project names are then
displayed in their client's color.
Improved
support for international time and number formats. PicoTrak honors the
time format and number format selected in the Palm Prefs application.
The oft-requested
hundredths of an hour time format has been added.
The edit
time dialog behaves in an additive fashion, rather than each digit being
independent.
On the Summary
screen, the project totals are displayed in the selected time format.
On the main screen,
the auto scroll feature now accepts digits as well
as letters.
In the "sort
by client" view, with the "Sort completed projects to end"
option turned on, completed projects are sorted to the end of the entire list,
rather than only to the end of their respective client sections, as before.
A small bug was fixed:
If you renamed a project to the name of an existing project, you would get two
entries by that name in the project name list.
Note: There
was no version 1.6.
New in Version 1.5
The Export to Memo feature allows you to optionally specify a range
of dates to be exported. It also allows you to optionally include the totals
in the exported data.
The Summary screen includes a project-by-project summary.
You can edit and/or delete the project names as used in the popup menu on
the New Project and Summary screens.
On the main display, if you enter a lowercase letter, the display will scroll
to the first project (or client when in list-by-client view) that starts with
that letter (uppercase or lowercase). Entering a period (i.e. tap-tap) will
cause the display to scroll to the project being timed.
Bugs Fixed
After using the Purge command to delete all dates marked as billed,
the project totals displayed on the main screen were not being updated. This
has been fixed.
The occasional problem where the main list would "jump" back when
scrolling has been fixed. Unfortunately, this required getting rid of the
live scrolling feature.
New in Version
1.4
The Export to Memo function will automatically create multiple memos
if the data exceeds the maximum memo size of 4000 characters.
The Export to Memo function will automatically convert any newline
in a note to a space. This will prevent the columns from being messed up when
the data is imported on the desktop.
You can tap on the today column to start and stop the timer.
The Summary screen can display the summary for a specified client
or a specified project.
The New Project dialog includes a popup that allows you to easily
set the name to that of an exsiting project.
New in Version
1.3
A Summary screen that can display the total times across all projects
between any two dates.
You can add a note to the current date of a project (even if it's the project
being timed) directly from the main screen.
On the Project Details screen, you can sort the date list either ascending
or descending.
The Purge command includes an option to purge all billed dates.
The Export to Memo command includes an option to automatically mark
all exported dates as billed.
PicoTrak databases are fully backed up during a HotSync function.
The Delete Project function has been moved from a button to a menu
item.
New in Version
1.2
An option to have the main list sorted by client name (with the client names
displayed).
The ability to add a date in the past to a project.
The "wandering timer" bug is fixed.
New in Version
1.1
The ability to export your data to a memo in the MemoPad (see below for details).
Total times are now being rounded (to the nearest minute or nearest tenth
of an hour, depending on the preference setting) rather than truncated.
A new option to display total times rounded to the nearest quarter hour.


